I'd just like to start here by saying this is probably not a post for the gentlemen. You're more than welcome to read it if you like but the Mooncup is a feminine hygiene product and I'll probably go into details that you don't want to know!
Now that that's out of the way, the Mooncup is one of several menstrual cups on the market. It's a small cup made of medical grade silicone that sits as far down in the vagina as possible and collects menstrual blood rather than absorbing it. It come in two sizes, A and B. Size A is recommended for women over the age of 30 or those that have had a vaginal birth. It's slightly larger than size B at 46mm in diameter and 50mm long as vaginal and pelvic floor tones naturally reduce with age. Size B is recommended for anyone under 30 or has not given birth vaginally and measures 43mm in diameter and 50mm in length. Both sizes have a 21mm long pull stem at the base which can be trimmed down or cut off completely depending on personal preference.
I decided to try a Mooncup after doing a bit of reading about the different styles and various positives and negatives of menstrual cups versus more 'conventional' sanitary items.
Advantages of pads and tampons:
- They're very easy to find and come in a variety of brands, absorbency, shape and size so they're suitable for just about all women at all stages of the cycle.
- Most women are comfortable using one or both of these items according to their personal preferences and needs.
- Washable pads and organic pads and tampons are also available for women that may be more environmentally conscious.
Disadvantages of pads and tampons:
- They're not exactly cheap and the costs build up quite a bit over time.
- Tampons are associated with an increased risk of Toxic Shock Syndrome (TSS) which can potentially lead to death.
- Tampons may also leave behind fibers when removed which can lead to irritation.
- The use of pads and tampons may encourage bacterial growth which can lead to yeast infections (thrush) and general irritation such as chaffing from pads.
- Pads and tampons often contain bleach and other chemicals which some women are sensitive to and experience rash or discomfort when they come into contact with those chemicals.
- They also have a very large environmental impact with billions of items making their way to landfills every year. Lunapad, a reusable pad company, claim that the average woman will throw away 125-150kg of sanitary items in her lifetime. The environmental impact also covers the water and resources required to grow cotton, and then all the other materials used to refine it and put together the finished product.
Advantages of Mooncup.
-It's made of medical grade silicone which is free from all of the nasty chemicals that can be found in pads and tampons.
- It's reusable for up to 5 years (although many women have continued to use them for much much longer) so leaves a significantly smaller environmental footprint.
- It collects rather than absorbs so it doesn't allow a surface area for bacteria to grow on and reduces the risk of infection and TSS.
- The soft medical grade silicone won't leave behind any fibres or cause rash or irritation.
- The other advantage of collecting rather than absorbing is that it won't mess up the natural pH and moisture of your vagina. Tampons absorb the natural lubricating excretions which can leave some women feeling very uncomfortable and increase the chance of pain or discomfort when removing or inserting a tampon.
- Mooncup can be used through any stage of the menstrual cycle and even just for women that have a particularly large or uncomfortable amount of normal vaginal discharge.
- It's able to hold more fluid than a tampon which means that it doesn't have to be changed as often and is much more convenient when going out or travelling.
Disadvantages of Mooncup.
- Can be challenging to insert and remove at first until you get the hang of it.
- Many women find the idea of menstrual cups disturbing or even downright disgusting.
- It's an expensive buy if you decide that you don't like it and don't want to continue using it.
- Not caring for it properly can cause the silicone to become hard.
For me it seemed like an obvious choice so I forked out the $45 including delivery to give it a try.
Even after only a few days use before I didn't need it anymore I fell in love with my Mooncup. At first it felt a little uncomfortable but after trimming back the pull stem I found that I could feel it less than when using a tampon. It was definitely a bit of a challenge to insert it at first but after carefully reading the information pamphlet that it came with and a bit of practice I soon found the folding method that worked best for me.
Removing it was also a lot easier than I expected, even after removing most of the pull stem. I walked the 20minute round trip to the shops with it in and felt no discomfort at all. I wore it to work and there was still no issue. When I was done for the month I cleaned it in boiling water as per the instructions and put it back in its little bag to wait for next time.
The biggest downside that I could think of is that it's a bit tricky to
get in and out at first but even by the end of the day I found it was
much easier than at the start.
All in all I would definitely recommend this product - in fact I already have. It really comes down to personal preference whether or not this would be suitable for you but it really is a fantastic product. I'd definitely recommend to any woman thinking about giving it a go to try it, you might just be pleasantly surprised!
At the end of the day I would say go with whatever makes you feel the most comfortable. Either way, if it is or isn't the product for you, hopefully this has answered some questions and helped you make a decision :)
Tuesday, 28 January 2014
Friday, 17 January 2014
Cooking Brownies With My Almond Flour!
If you read my last post then you'll know all about my urge to make brownies. I started by making my own almond flour and you can find the method in the blog post here.
The recipe is from Diana Keulian over at Real Healthy Recipes. Diana is a passionate real-food home cook who aims to make delicious yet nutritious meals, snacks and treats for her family.
This recipe uses almond flour instead of highly processed white flour, raw honey instead of highly processed cane sugar and coconut oil instead of butter. While all of these things are better for your body than the alternatives, you should still remember that they're quite calorie dense and should be treated the same as other snacks. A healthier alternative but it doesn't mean you can eat lots all the time!
You can find the full recipe here.
So lets get started! First gather all your ingredients and preheat the oven to 180C or 350F. I did tweak this recipe a little based on what I had available. I used 85% dark chocolate because it was on special at the shops, dark chocolate is a healthier alternative to milk chocolate as it contains less sugar, but the darker the chocolate the more bitter the brownies will be. I also used a variety of honey that tends to be a little less on the sweet side so I used slightly more to account for that.

Next step, gently melt 1/2 cup coconut oil, 1/3 - 1/2cup honey and 100gm dark chocolate. Of course, when you're in the middle of an Australian summer, the coconut oil and honey should already be liquid enough to skip this step. I just melted them over a low heat on the stove. Then stick them in a bowl and mix them together.

While that's cooling, give two eggs a gentle whisk in a bowl and add 1tbsp of vanilla and 1/4tsp of almond extract. Add that into the rest once it's cooled. You can also grab another bowl and mix 1/2tsp of sea salt in with 3/4cup of almond flour.

Add the wet ingredients to the dry and mix thoroughly. Add half a cup of mini chocolate chips in here as well and mix them through!

Once that's mixed add it to whatever pan or tin you're cooking it in. Diane uses mini cupcake pans but I used a rectangle pan because that's all I have available. Also lightly greased with coconut oil before the batter went in. Smooth it out and stick it in the oven!

Depending on your oven, it should take around 15-25minutes to cook. My oven is a little bit evil and cooks horribly unevenly so I had burnt corners and not quite cooked in the middle. If you have a better oven than me you should have no issues, otherwise know your oven well enough to compensate :)
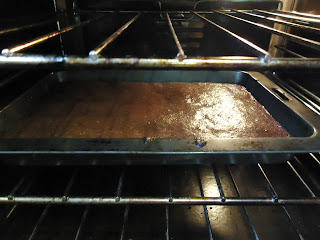
Once it's done take it out and allow it to cook down completely on the bench. If you don't then they'll fall apart when you try to take them out. Take my work for it, it's what I did ;)

Once it's cooled, or still a bit warm if you're too keen to try them, cut them into small pieces and enjoy :) Stick them in an airtight container in the fridge to retain freshness.

Even though I tweaked a few things and was impatient this recipe produces a beautiful moist, nutty brownie. Next time I'll use dark chocolate that has a lower cocoa percentage as 85% makes it just a tad too bitter for my preference. My oven made it cook unevenly but burnt or slightly undercooked it's still delicious. They're moist enough that you can squeeze them in together if they fall apart too. But I'll also let them cool down completely the next time I make them! It's also easy to adapt and add or change things to create a different flavour. You could add roughly chopped nuts or change the vanilla and almond extracts to different flavours. Next time I think I'll try it with peppermint extract as well, as I love a good choc-mint anything!
The home-made almond flour added a delicious nutty flavour as well as a slightly rough texture. As I spoke about in the almond flour post, I could have continued to grind the flour to make it a much finer texture but I chose not to. That didn't impact this recipe at all, in fact, I think the extra texture was great.
This is definitely a recipe that I will use again and I love that it's also better for you than many other recipes in several ways.I definitely recommend giving it a go and have a look through the rest of Diana's website or like her facebook page for updates on her new recipes and real food healthy eating adventure :)
Wednesday, 15 January 2014
Making Almond Flour!
Yesterday I felt the urge to bake wash over me again. Specifically, brownies. I found a healthier alternative brownie recipe by Diana Keulian, a passionate real-food, real healthy home cook, and decided to give it a shot (more on that later).
After having a look in the shops for almond flour with my housemate and drastically failing, I sent Diana a message through her facebook page and asked if buckwheat flour would be an acceptable alternative. Diana replied saying that you can make almond flour at home in a food processor, just chuck 'em in and grind 'em up!
Luckily, I happened to have some raw almonds that I bought at a farmers market and never got around to using and so my excitement began...
First a little bit about almond nutrition. Almonds are what is referred to as 'nutritionally dense' meaning that they pack a whole heap of good stuff in a small serving. They're a great source of fiber as well as a variety of vitamins and mineral including manganese, magnesium, iron, calcium, phosphorus, potassium, vitamin A, E, K and B1-3, 5, 6 and 9 as well as many others. Not only that, they're a great source of healthy fats and an excellent addition to low carb, gluten free diets. Almonds can be eaten whole, included in recipes as a flour (what I made), made into a nutritious milk or into almond butter and used as an alternative to peanut butter for those with peanut allergies.
Making your own almond flour is a much cheaper alternative to buying it and you can ensure that there's no extra preservatives or hidden nasties that you might find in store bought. And it really is as easy as Diana said it would be!
Most recipes call for blanched almond flour, made from almonds with no skins, but I decided to keep my skins on because I was too excited to take the time to soak and take the skins off. There's also quite a lot of fibre and antioxidants in the skins and a little fibre never hurt anyone ;)
After doing a bit of googling and youtubing for any tips and tricks I decided I was ready to give it a shot!
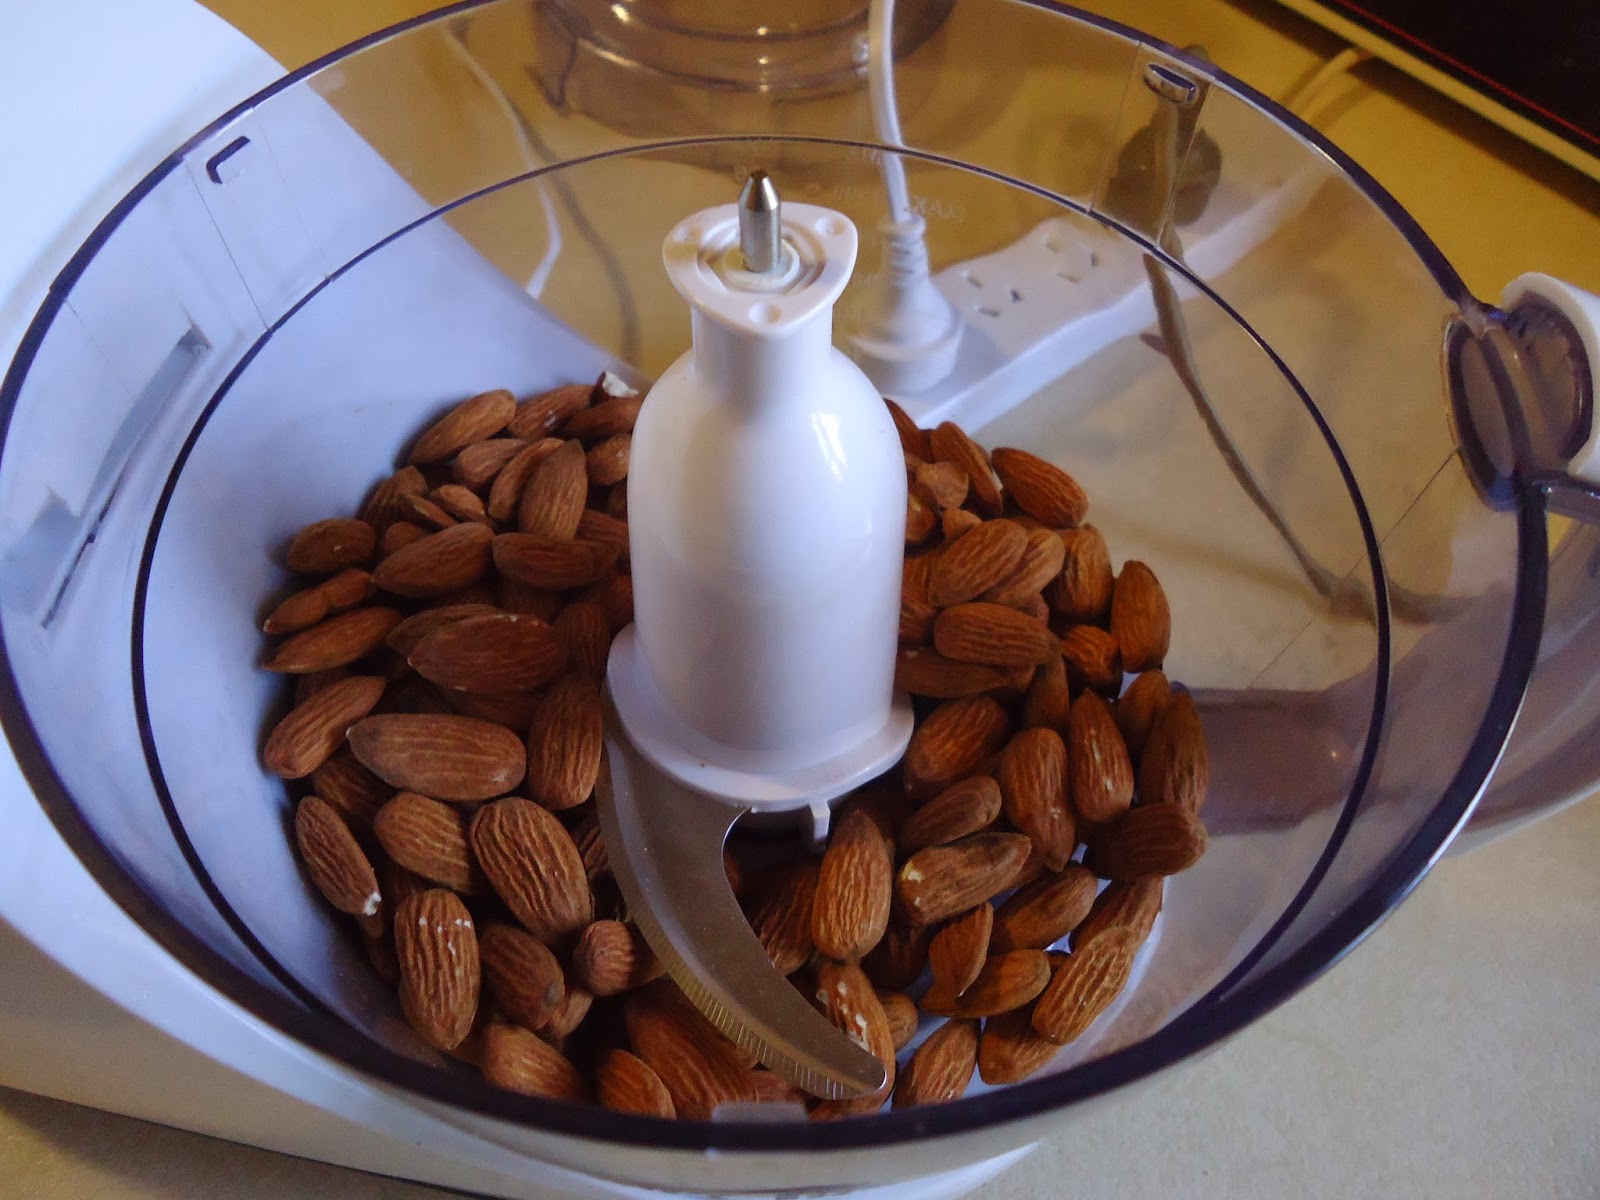
All you need is almonds, can be raw or roasted but preferably organic to avoid any nasty chemicals, a food processor, a stainless steel sieve, a bowl and an airtight container for storage.

I used two cups of raw almonds. Throw them in the food processor, stopping every now and again to make sure it's not turning into butter and just checking the general consistency.


Run the ground almonds through the sieve to get out any chunks and achieve a consistent texture, run the bigger pieces through again!
Once everything has been ground down it's ready to use. Put any leftovers into an airtight container and store in the fridge or freezer as exposure to air and sunlight will cause it to rancid pretty quickly if left in a cupboard. I made around a cup and a half of flour (left) from two cups of whole nuts. I could have made more but by the end I had lots of little nut pieces a bit more to the consistency of meal (on the right) which were taking a long time to put through the processor and I decided to keep them separate to add to yoghurt or chia porridges etc. Seemed like a great topper to add so I kept them :)

So there you have it! Super easy to make at home as a healthier, grain free, gluten free alternative to heavily processed wheat flour. My batch turned out better than I was expecting. Still coarser than shop flour but contains only one ingredient and no preservatives. Overall I'm very happy with how this turned out! Shortly after I used them to make the brownie recipe I mentioned at the beginning of this entry and if you look out tomorrow you can see how they turned out ;)
After having a look in the shops for almond flour with my housemate and drastically failing, I sent Diana a message through her facebook page and asked if buckwheat flour would be an acceptable alternative. Diana replied saying that you can make almond flour at home in a food processor, just chuck 'em in and grind 'em up!
Luckily, I happened to have some raw almonds that I bought at a farmers market and never got around to using and so my excitement began...
First a little bit about almond nutrition. Almonds are what is referred to as 'nutritionally dense' meaning that they pack a whole heap of good stuff in a small serving. They're a great source of fiber as well as a variety of vitamins and mineral including manganese, magnesium, iron, calcium, phosphorus, potassium, vitamin A, E, K and B1-3, 5, 6 and 9 as well as many others. Not only that, they're a great source of healthy fats and an excellent addition to low carb, gluten free diets. Almonds can be eaten whole, included in recipes as a flour (what I made), made into a nutritious milk or into almond butter and used as an alternative to peanut butter for those with peanut allergies.
Making your own almond flour is a much cheaper alternative to buying it and you can ensure that there's no extra preservatives or hidden nasties that you might find in store bought. And it really is as easy as Diana said it would be!
Most recipes call for blanched almond flour, made from almonds with no skins, but I decided to keep my skins on because I was too excited to take the time to soak and take the skins off. There's also quite a lot of fibre and antioxidants in the skins and a little fibre never hurt anyone ;)
After doing a bit of googling and youtubing for any tips and tricks I decided I was ready to give it a shot!
All you need is almonds, can be raw or roasted but preferably organic to avoid any nasty chemicals, a food processor, a stainless steel sieve, a bowl and an airtight container for storage.

I used two cups of raw almonds. Throw them in the food processor, stopping every now and again to make sure it's not turning into butter and just checking the general consistency.

Run the ground almonds through the sieve to get out any chunks and achieve a consistent texture, run the bigger pieces through again!

Once everything has been ground down it's ready to use. Put any leftovers into an airtight container and store in the fridge or freezer as exposure to air and sunlight will cause it to rancid pretty quickly if left in a cupboard. I made around a cup and a half of flour (left) from two cups of whole nuts. I could have made more but by the end I had lots of little nut pieces a bit more to the consistency of meal (on the right) which were taking a long time to put through the processor and I decided to keep them separate to add to yoghurt or chia porridges etc. Seemed like a great topper to add so I kept them :)

So there you have it! Super easy to make at home as a healthier, grain free, gluten free alternative to heavily processed wheat flour. My batch turned out better than I was expecting. Still coarser than shop flour but contains only one ingredient and no preservatives. Overall I'm very happy with how this turned out! Shortly after I used them to make the brownie recipe I mentioned at the beginning of this entry and if you look out tomorrow you can see how they turned out ;)
Subscribe to:
Posts (Atom)